Terzani online museum
Introduction
The Terzani Online Museum is a student course project created in the scope of the DH-405 course. From the archive of digitized photos taken by the journalist and writer Tiziano Terzani, we created a semi-generic method to transform IIIF manifests of photographs into a web application. Through this platform, the users can easily navigate the photos based on their location, filter them based on their content, or look for similar images to the one they upload. Moreover, the colorization of greyscale photos is also possible.
The Terzani Online Museum is available following this link.
Motivation
Many inventions in human history have set the course for the future. One of them is the film-camera, which has transformed the way we share bondings and stories. Storytelling is an essential part of the human journey. Starting from what one does when waking up in the morning to the explorations in the deep space, stories form the connections. The tales were mostly transferred orally historically. Later came writing practices like Roman's codices to today's daily Petabytes of information stored in data centers. These means of transmission have always influenced their times and the way historians perceive it. One such information transmission means that emerged in the 19th century is the film-camera[1]. The invention of the camera[2] started to change the landscape of narrative. The boom of a camera resulted in an abundance of photographs capturing the events throughout the 20th century. However, today the vast majority of them are lying in the drawers or archives possessing a risk of wearing out or being destroyed. While digitize would prevent photographs from wearing out, knowledge extraction is not possible. Hence we have to create a medium for these large collections of photos, such that anyone, anywhere, can easily access them. This medium would help understand the then situations better. If not for research, it is always fascinating to visit history and alluring to see the pictures of past times.
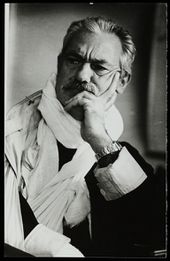
Our project focuses on Tiziano Terzani, an Italian journalist, and writer. During the second half of the 20th century, he had extensively traveled in east Asia[3] and witnessed many important events. During these trips, he and his team captured many pictures of immense historical value. The Cini foundation digitized some of his photo collections 'Terzani photo collections'. Nevertheless, having to go through an innumerable number of images is not productive. Our project thus constitutes the creation of a Web application facilitating the access of the Terzani photo archive to a 21st-century digital audience that would help access these photographs and travel through them.
Description of the realization
The Terzani Online Museum is a web application with multiple features allowing users to navigate through Terzani photo collections. The different pages of the website described below are accessible on the top navigation bar of the website.
Home
The home page welcomes the users to the website. It invites them to read about Terzani or to learn about the project on the about page.
About
The about page describes the website's features to the visitors. It guides them through the usage of the gallery, landmarks, text queries, and image queries.
Gallery
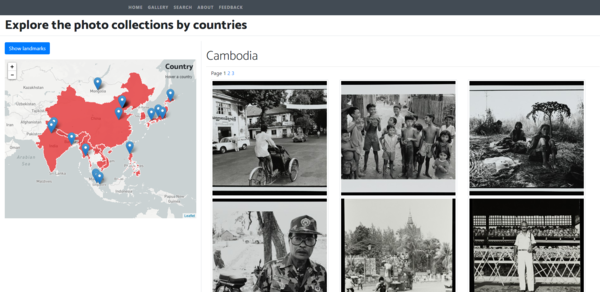
The gallery allows the users to quickly and easily explore photo collections of particular countries. On the website's gallery, the users can find a world map centered on Asia. On top of this map, a red overlay shows the countries for which photo collections are available. By clicking on any nation, users can view the pictures associated with that country and navigate through the collection by selecting different page numbers. By clicking on the displayed image, users can open a modal window displaying the full photo - unlike the gallery where cropped photographs are shown - alongside its IIIF annotation. An option to colorize the images is also available on the modal window.
The next feature on the gallery is to be able to see at a glance the famous landmarks that are present in the photographs. For that, the users can click on the Show landmarks button above the map to display markers on the map at the locations of the landmarks. On clicking the highlighted spots opens a small pop-up with the location name and a button to show the photos of that landmark.
Search
On the Terzani Online Museum's search page, users can explore the photographs depending on their content. The requests can be either made by text, to search for photos whose content corresponds to the input text, or by image to get the set of photographs that are most similar to the uploaded one. The search results are displayed similarly to the gallery.
Text queries
Users are invited to input in a text field the content they are looking for in the Terzani collection photos. This content can correspond to multiple things. It can be general labels associated with the photographs, it can be specific localized objects in the image, or it can be recognized text from the photos.
Below the text field, users can select two additional parameters to tune their queries. Only show bounding boxes restrains the results to the localized objects and crops their display around them. Search with exact word constraints the search domain to match precisely to the input and thereby not displaying the results that are generated by possible combinations of the words.
Image queries
Users can also upload an image from their machine and obtain the 20 closest pictures analyzed in comparison with all the photos of the collection.
Photo colorisation
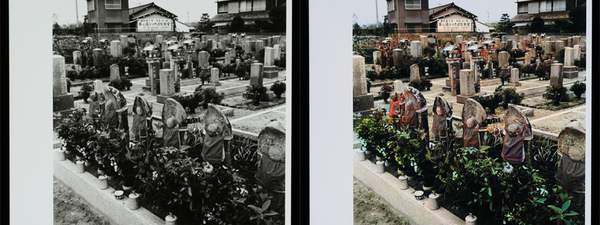
To breathe life into the photo collections, we implemented a colorization feature. When the users click on a photo and on the button to colorize it, a new window displays the automatically colorized picture.
Note: the following feature is disabled on the website currently because of the lack of GPU
Methods
Data Processing
Acquiring IIIF annotations
The IIIF annotations of photographs form the basis of the project, and the first step is to collect them. The Terzani archive is available on the Cini Foundation server[4]. However, it doesn't provide any specific API to download the IIIF manifests of the needed collections. Therefore, we use Python's beautiful soup module to read the root page of the archive[5] and extract all collection IDs from there. Using the collected IDs, we obtain the corresponding IIIF manifest of the collection using urllib. Consequently, we read this manifest and only keep the annotations of photographs whose label explicitly says that it represents the recto (front side) of it.
In our project, we display a gallery sorted by country. Although the country information is not present in the IIIF annotation, it is available on the root page of the Terzani archive[6]. The collection's name takes after their origins. As these names are written in Italian and not formatted the same, we manually map the photo collection to its country. In this process, we have ignored those collections that have multiple country names.
Annotating the Photographs
Once in possession of the IIIF of the photographs, we annotate them using Google Cloud Vision. This tool provides a Python API with a myriad of annotation features. For the scope of this project, we decided to use the following :
- Object localization: Detects which objects are on the image with their bounding box
- Text detection: OCR text on the image alongside their bounding box.
- Label detection: Provides general labels to the whole image
- Landmark detection: Detects and returns the name of the place and its coordinates if the image contains a famous landmark.
- Web detection: Searches if the same photo is on the web and returns its references alongside a description. We make use of this description as an additional label for the whole image.
- Logo detection: Detects any (famous) product logos within an image along with a bounding box.
For each IIIF annotation, we first read the image data into byte format and then use the Google Vision API to get the annotations. However, some of the information returned by API cannot be used as-is. We processed bounding boxes and all texts the following way :
- Bounding boxes: To able to display the bounding box with the IIIF format, we need its top-left corner coordinates and its width and height. For OCR text, logo, and landmark detection, the coordinates of the bounding box are relative to the image, and thus we directly use them.
- In the case of object localization, the API normalizes the bounding box coordinates between 0 and 1. The width and height information of the photo is present in its IIIF annotation, which allows us to "de-normalize" the coordinates.
- Texts: Google API returns text in English for various detections and in other identified languages for text OCR detection. As to improve the search result, along with the original annotation returned by the API, we also add tags after performing some cleansing steps. The text preprocessing
- Lower Case: Convert all the characters in the text to lowercase
- Tokens: Convert the strings into words using nltk word tokenizer.
- Punctuation: Remove the punctuations in words.
- Stem: Converts the words into their stem form using the porter stemmer from nltk.
We then store the annotations and bounding box information together in JSON format.
Photo feature vector
The feature vector of a photograph finds its use in the search for similar images. For each photo in the collection, we generate a 512-dimensional vector using Resnet to represent the image. The feature vector, which is the output of the Convolutional Neural Network, is a numeric representation of the photo. Recently there has been a plethora of success in training the deep neural networks that perform tasks such as classification and localization with near-human cognition. The hidden layers in these networks learn the intermediate representations of the image, and thus they can serve as a representation of the image itself. Hence for this project, to generate the feature vectors of the photo collections, we used a trained Resnet 18. We chose Resnet because of the relatively small feature size. The feature vector is output at the average pooling layer before flattening the image
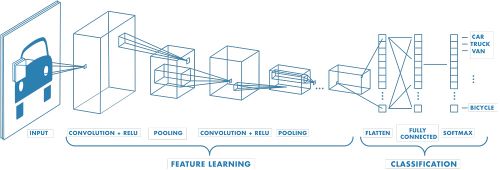
, where the feature learning part ends. Similar to the annotations, a JSON document stores the vectors.
Database
As the data is primarily unstructured owing to the non-definitive number of tags, annotation, and bounding boxes an image can have, we use a NoSQL database and choose MongoDB due to its representation of data as documents. Using the PyMongo, we created three different collections on this database.
- Image Annotations: This is the base collection where each object has a unique ID and contains an IIIF annotation and in addition to the annotations that have a bounding box (object localization, landmark, and OCR) obtained with Google Vision.
- Image Feature Vectors: This collection contains the mapping between the object ID and its corresponding feature vector.
- Image Tags: This is a meta collection on top of the Image Annotations to help process the text search queries faster by searching the labels and returning the related image labels. It contains one object for each annotation, bounded object, landmark, and text detected by Google Vision, and they store a list of IDs of photos corresponding to them.
Website
Back-end technologies
In order to create a Web Server that could easily handle the data in the same format we had used so far, it felt natural to choose a Python Framework. As the web application we wanted to build did not require complex features (e.g. authentication) we chose to use Flask which provides the essential tools to build a Web server.
The server is mostly responsible for processing the users' queries and to make the bridge between the client and the database. It also takes care of the computational heavy task of make the photographies colorisations that the users request.
Front-end technologies
To build our webpages, we make use of course of the traditional HTML5/CSS3. To make the website responsive on all kinds of devices and of screen sizes, we use Twitter's CSS framework Bootstrap. All programming on the client side are made in JavaScript with the help of the JQuery library. Finally, for an easy usage of data coming from the server, we use the Jinja2 templating language.
Gallery by country
To create the interactive map, we used the open-source JavaScript library Leaftlet[7]. To put in evidence the countries that Terzani visited, we used the feature that allows us to display GeoJSON on top of the map. We used GeoJSON maps[8] to construct such a file only containing the desired countries.
When the user clicks on a country, the client makes an AJAX request to the server asking for the first 21 photos of this country. In turn, the server queries the database to get the IIIF annotations of these 21 photos as well as the total number of photos from this country. When the client gets these information back, it uses the image links from the IIIF annotaitons to display them to the user. The total number of results for a given country serves to
compute the amount of pages required to display them all. To create the pagination, we use HTML <a> tags, which, on click, make an AJAX request to the server asking for the relevant IIIF annotations
Map of landmarks
When the user clicks on the Show landmarks button, an AJAX request is made to server asking for the name and geolocalisation of all landmarks in the database. With these information, we can create with the Leaflet library a marker for each unique landmark. Leaflet also allows us to create a customized pop-up when we click on such landmarks. These pop-ups contain simple HTML with a button which, on click, queries for the IIIF annotations of the corresponding landmark.
Search by Text
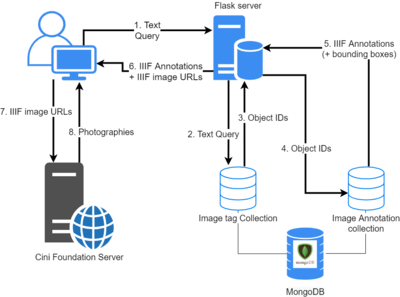
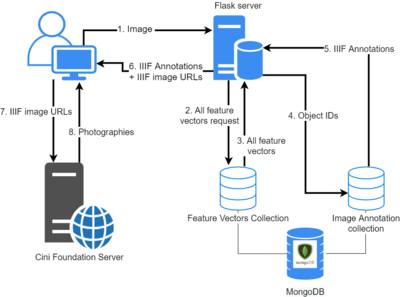
Querying photographies by text happens in multiple steps describe below. To get a clearer idea of where each step happens in the pipeline, each of them directly refer to the corresponding number of the schema on the right. These steps do not explain how the pagination is created as the process is the exact same as for the gallery.
- The user types his query on the website. The client makes a request containing the user input to the server.
- Upon receiving the user text query, the server .... **Ravi ?** . Then it queries the
Image Tagcollection to retrieve the IDs of 21 objects corresponding to the query. - The MongoDB database responds with the desired object IDs
- Upon receiving the object IDs, the server queries the
Image Annotationcollection to retrieve the IIIF annotation of these objects. If the user checked theOnly show bounding boxescheckbox, the server also asks for the bounding boxes information. - The MongoDB database responds with the desired IIIF annotations and the eventual bounding boxes.
- When the server gets the IIIF annotations, it performs some processing on the IIIF image links. If the user wanted to show the bounding boxes only, it creates a IIIF image URL such that each image is cropped around its bounding boxes. In any case, the IIIF image URL is also constructed so that the resulting image has the shape of a square. When the server is done with this processing, it sends all IIIF annotations as well as these IIIF image URLs to the client.
- Using Jinja2, the client creates an HTML
<img>for each Image URLs. The image data, hosted on the Cini Foundation server, are queried using the IIIF image URLs. - The Cini Foundation server answers with the images data and they can finally all be displayed to the user.
Search by Image
The process to query similar photographies is similar to the text queries. Again each step described below corresponds to its number on the schema on the right
- The user chooses an image from its computer. The client makes a request containing the data of this image to the server
- Upon receiving this request, the server computes the feature vector of the user's image using a ResNet50 Ravi. It then queries the database for all feature vectors.
- The database answers with all feature vectors
- When the server has all the feature vectors, it compares each of them with the one from the user's image using cosine distance. Then, only the 20 closest feature vectors and the server selects their corresponding object IDs. Once it has these IDs, it queries the
Image Annotationdatabase for the IIIF of the photos. - The database responds with the 20 IIIF annotations.
- The server process the IIIF image link so that the image will have the shape of a square and sends this information back to the client.
- Using Jinja2, the client creates an HTML
<img>for each Image URLs. The image data, hosted on the Cini Foundation server, are queried using the IIIF image URLs. - The Cini Foundation server answers with the images data and they can finally all be displayed to the user.
Quality assessment
We have successfully created a structured pipeline to perform the crucial steps for extracting the data and making it available for search engines. In further subsections, we provide the analysis and evaluation of the effectiveness of each step.
Data Harvesting
The first step in the pipeline is to obtain the photographs available on the Cini Foundation server. As the website did not provide an API to access the data, we have resorted to standard web scrapping techniques on the HTML page and create a binary file to store the IIIF annotation of the image. Although we have successfully extracted all the images present on the server, there is an amount of manual work that prevents making this an autonomous step. The other hurdle is the country information for each photograph for which we have manually annotated countries by going through the website. Thus not all images have a country associated with them as collections have multiple countries associated with them.
Text based Image search
The creation of tags to search images based on is one of the trickiest steps in the pipeline, as we have the least control over the process of creation. The Google Vision API has produced sufficiently reliable results for most of the photographs that have observable objects in recent past photography. However, in terms of text, the API itself has constraints on the languages that it can automatically. Thus, most of the detected text is the one that contains English alphabets. Nevertheless, for that text that is visible, we have results that are many times not evident to the human eyes. As we do not store any of the images on google cloud storage, the process itself cannot happen asynchronously and amounts to large amounts of lead time.
It is always strenuous for the user to search for exact words and find a match. Thus we resorted to using regular expressions for the search queries. Nevertheless, this comes with the problem of returning many search results that might not be relevant always. For instance, the search for a car or a cat can show images of carving or a cathedral.
<write user feedback on search results>
The results in the section of the website were widely acceptable.
Similar Image search
Alike the other search engine, the results in this section are also not measurable through a metric. The observation from the search results is that they are returned based on the structures present in the source image. These results are appropriate most of the time as the engine would return faces for faces, buildings for buildings, and cars for cars. Due to the constraint that most of the photographs are monochromatic, the colors in the source images do not significantly aid the search process.
Although the next issue does not directly concern the quality of the result produced, it would affect the user's interaction with the service. Currently, the search between the images happens sequentially. Parallelizing this would expedite the process.
<write user feedback on search results>
Code Realisation and Github Repository
The GitHub repository of the project is at Terzani Online Museum. There are two principal components of the project. The first one corresponds to the creation of a database of the images with their corresponding tags, bounding boxes of objects, landmarks and text identified, and their feature vectors. The functions related to these operations are inside the folder (package) terzani and the corresponding script in the scrpits folder. The second component is the website that is in the website directory. The details of installation and usage are available on the Github repository.
Limitations and Scope for Improvement
Schedule
| Timeframe | Tasks |
|---|---|
| Week 5-6 |
|
| Week 6-7 |
|
| Week 7-8 |
|
| Week 8-9 |
|
| Week 9-10 |
|
| Week 10-11 |
|
| Week 11-12 |
|
| Week 12-13 |
|
| Week 13-14 |
|
